JDS is a window manager, a program that governs the display of windows on your screen. The example shown above illustrates some of the items that might typically be found on the desktop.
workspace - the background of the desktop
Launch Menu - hierarchical menus for launching programs; some parts customizeable,
ControlPanel - a customizeable, graphic menu bar for tasks.
Terminal - window for typing Unix commands
Textedit - text editor for ASCII files
Nautilus File Manager - create, move or rename files or directories
As many copies of a program or window can be present on the
desktop as you wish.
 TThe Mouse in Unix uses 3-buttons. The left button is
the Select button. Essentialy everything you do is done with the left
button. The right button is the Menu button. Holding down the right
button over any window or part of a window, or even the desktop
background, will give you a context-dependent menu. The Center button
is the paste button. If you select a block of text in one place, you
can move the cursor to another place, press the center button, and the
selected text will be copied into the new location. This is sometimes a
DANGEROUS button, because it is very easy to accidentally select and
past a large block of text! On some mice, the center button is also a
wheel that can be used for scrolling.
TThe Mouse in Unix uses 3-buttons. The left button is
the Select button. Essentialy everything you do is done with the left
button. The right button is the Menu button. Holding down the right
button over any window or part of a window, or even the desktop
background, will give you a context-dependent menu. The Center button
is the paste button. If you select a block of text in one place, you
can move the cursor to another place, press the center button, and the
selected text will be copied into the new location. This is sometimes a
DANGEROUS button, because it is very easy to accidentally select and
past a large block of text! On some mice, the center button is also a
wheel that can be used for scrolling.
There are two ways to change desktop properties:
Launch --> Preferences --> Desktop Preferences - This is usually the quickest and easiest way to customize most characteristics of your desktop. However, these menus contain only the most frequently used features of the desktop.
Launch --> Applications --> Utilities --> Configuration Editor - This program gives you very extensive set of desktop properties that can be set. However, the hierarchical set of menu items is complex, and it is sometime difficult to find the parameter you want to change.
Suggested
desktop properties
To help you get
started, here are suggestions for making JDS easiest to use. As you
get more proficient with JDS, you can experiment with different
settings until you are satisfied with how your desktop looks and
functions.
|
Window focus Choose Launch --> Preferences -->
Desktop Preferences --> Display --> Window Behavior. The best starting choices are to choose "Select windows when the mouse moves over them" and DE-select "Raise Window after an interval". The combination of these two settings is usually the most convenient, and certainly the least frustrating for new user
|
|
|
Window List Preferences To make it easier to have a large number of
windows open simultaneously, go to the vertical bar |
|
|
Create a launcher for the Nautilus file manager To start, we first need to make some room for a new launcher on the Panel. Hold down the right mouse button on the vertical bar to the left of the Window List. Choose "Move" and then slid the bar to the right a bit so that you create some extra space. Next, open the menu for the panel by right
clicking on the blank area of the panel. Choose Add to Panel --> Launcher (do NOT choose Launcher from menu). Now, fill in the Basic tab window as shown at right. To get the folder icon, click on the icon button, and choose the icon named 'blueprint-gnome-fs-directory-accept.png'.
|
nautilus --browser
.
|
| Tell
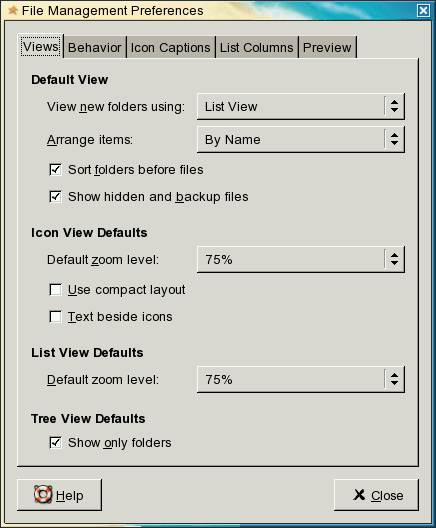
Nautilus to display details of files and directories File managers such as Nautilus or Windows Explorer show an Icon view of files. That, is each file is represented only by an icon and a name. However, other information about files is often very useful. For example, if a program shoud be generating several megabytes of output, but the output file is only 150 bytes, that is a good hint that something is wrong. Therefore, the List view is more informative. Launch Nautilus by double-clicking on the file folder icon  on the task bar. In Nautilus,
choose Edit --> Preferences
and make sure the Views tab is
displayed. Set View new folders using:
List
View. on the task bar. In Nautilus,
choose Edit --> Preferences
and make sure the Views tab is
displayed. Set View new folders using:
List
View. |
 |
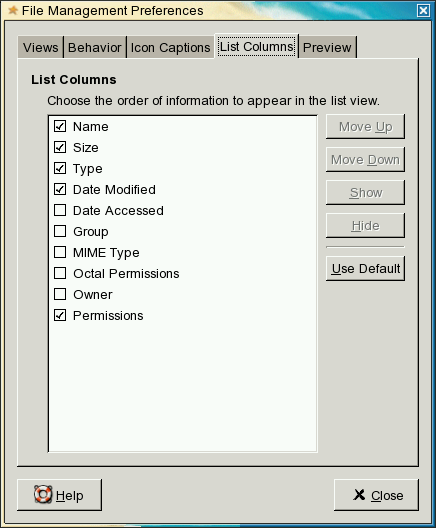
| Tell
Nautilus which columns to display in list view Click on the 'List Columns' tab and check the boxes shown at right. These tell Nautilus what information should be displayed for each file or directory. |
 |
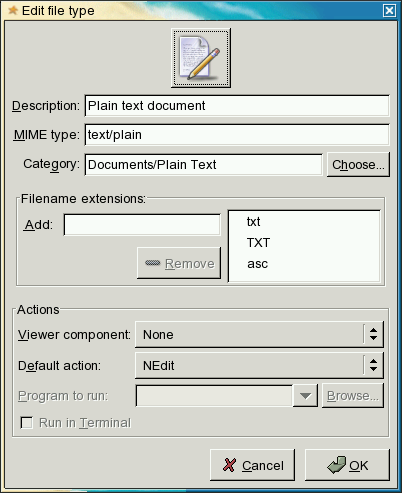
| Choose Nedit as the
default text editor Choose Preferences --> Desktop Preferences --> File Associations. Open Documents --> Plain Text. Choose Plain text document, and press the Edit button. Fill in the Edit file type box as shown at right. Check very carefully to make sure that things are typed in precisely as shown. If Nedit is not the Default action, either choose Nedit from the list, or type 'nedit' (without the quotes) in the Program to run box. Under Filename extensions, 'txt' and 'TXT' and 'asc' will probably already be present. If not, add them to the list. Also, we will be working with GenBank files, so also add the following extensions: 'gb', 'gen', and 'GEN'. That way, all of these types of files will be recognized as text fiiles, and will open up in the text editor when you double click on them in Nautilus. For the icon at the top, choose an icon with a pencil and paper, such as blueprint-gnome-mime-text.png. Q: Why don't we just use the default editor, gedit? A: First Nedit is far more powerful than gedit. Secondly, gedit is threaded, and when you have several files open at the same time, it is impossible to get them to appear in separate windows. Gedit will force multiple files into tabs within a single window. Nedit lets you view several files in independent windows: a very important capability when working with data. |
 |
|
Add a Terminal Launcher |
|
|
Add a Printer Manager to the Panel |
|
|
Making Nautilus open GenBank files in a
text editor |
|
|
|
|
SUGGESTIONS for topics to be added to this list are
welcome! Send email to psgendb@cc.umanitoba.ca
 next to the window
list on the control panel. Hold down the right mouse button to bring up
the menu for the window list:
next to the window
list on the control panel. Hold down the right mouse button to bring up
the menu for the window list: